By: Mark Abrams
It was a nice day in fall 2018 in November when we started the installation of the new site on top of Cerro Gordo which is above the town of Keeler and is about 15 miles from the town of Lone Pine, one of the larger towns in the eastern Sierras on Highway US395.

The installation was planned to be 2+ full days because we had a lot of work to do to complete the installation. We had to build a solar array to power the equipment in addition to the normal items that we needed to address during a site installation. This meant that the installation would take longer than usual.
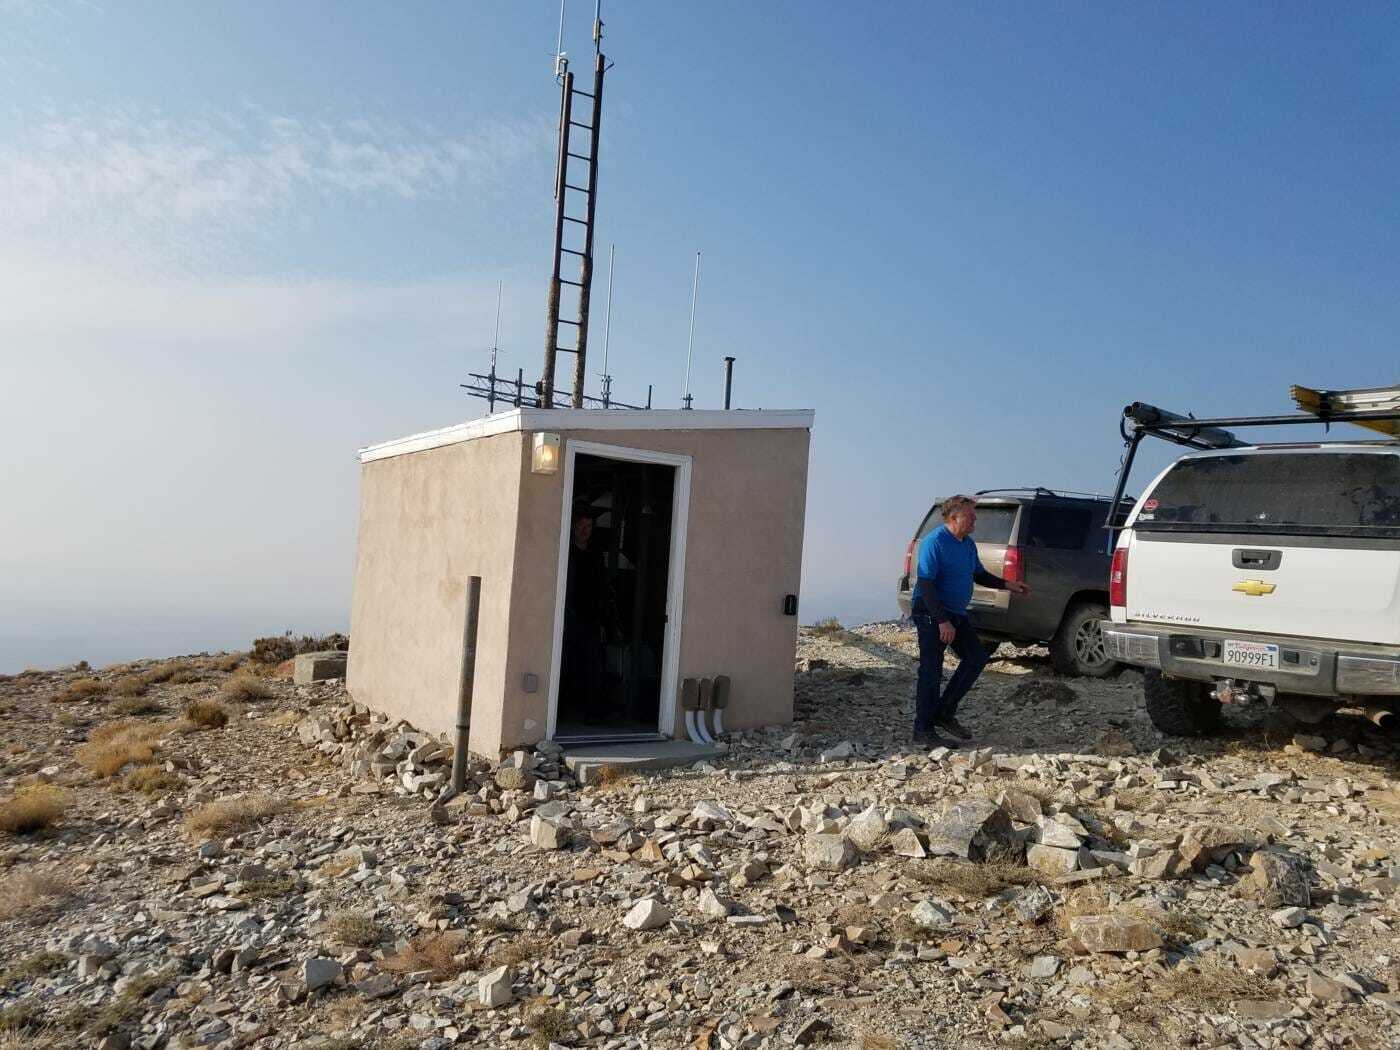
The three of us drove down to Lone Pine from Mammoth and arrived late in the day. We met David who drove up from Los Angeles with the equipment that we were to install. David’s plan was to unload some of the equipment at the site since we were staying in the local Best Western hotel for the next two nights and we were not certain of the security of the materials that we had tied down to the roof rack on our truck. Therefore David went up to the tower site with the intent of unloading some of the equipment. As he drove up the mountain, he passed through the Cerro Gordo mine which was a few hundred feet below the top of the mountain. He stopped and spoke to one of the miners who warned him about the mountain lions that inhabited the area who liked to attack small people such as children or people who would kneel down or bend over. He was also warned about the wind picking up late in the afternoon most of the time which was evidenced by the wrath of the wind lower on the mountain at the mine where David was talking to one of the miners. He continued up the hill to the summit where the radio towers were located and pulled his vehicle over to the building that he believed was the place where we were supposed to install our equipment.
After exiting the vehicle, he took out the keys and attempted to open the door. After a couple of tries, the door opened to reveal the crowded building space that was in disarray. He moved some equipment around inside to make space for the solar panels and the other materials that he intended to unload from his vehicle. After 10 minutes of moving equipment and materials, he was now ready for the task of removing the materials from his vehicle and storing them in the building. He started by attempting to unload the solar two solar panels by himself with the wind blowing about 20-30 miles per hour. It was a significant challenge to handle these panels by himself as the panels were 1 meter by 1.5 meters and could generate 300 watts each. These solar panels act like a sail in the wind and both panels were tied down with a single set of ties which meant that once he got one panel loose, both of them were loose. This created extra work to keep each panel from being lost or destroyed in the wind while trying to take them off the truck and place them inside the building for the night. With considerable effort, David managed to get both of the solar panels inside the building safely and then proceeded to unload the other materials which included antennas, masts, clamps, cable and connectors. After completing the task, he headed down the mountain to check into the motel and meet up with us.
We arrived around 6:30PM and met up with David. We were handed the keys to our room and then proceeded to find a restaurant to have dinner. We went to the local BBQ house where we ordered a dinner that was big enough to satisfy big appetites and had a wonderful flavor. In short, we were quite pleased with the meal. We then headed to the hotel to retire for the evening after discussing the game plan for the next day.
The next morning we got an early start up to the mountain after having breakfast and getting some supplies such as water and ice. We drove to Keeler and then up the dirt road. None of us except for David had ever been to the site so we were not aware that the radio site is just above an old mining operation that dates back to 1862 when silver was discovered in the Owens Valley and specifically at the Cerro Gordo mine. We passed through the mine and waived at the locals who were operating the mine while continuing our trek to the top of the mountain. Upon arrival a few minutes later, we stopped to admire the view from the site and then opened up the door to the building so see that our solar panels were still there.
It was now time to scout out the building to determine where we were going to install the equipment. The building was quite small so it was clear that there were few choices as to what location we would use for the installation. The perfect location for our equipment was blocked by an FM broadcast radio transmitter. Therefore, we decided upon the equipment location that was where the FM radio transmitter was located by moving their equipment to the top of the rack and installing our equipment in the lower portions of the rack so that both sets of equipment could coexist in the same location. The rack was owned by the owner of the tower site and he had given us permission to locate our equipment in the rack.
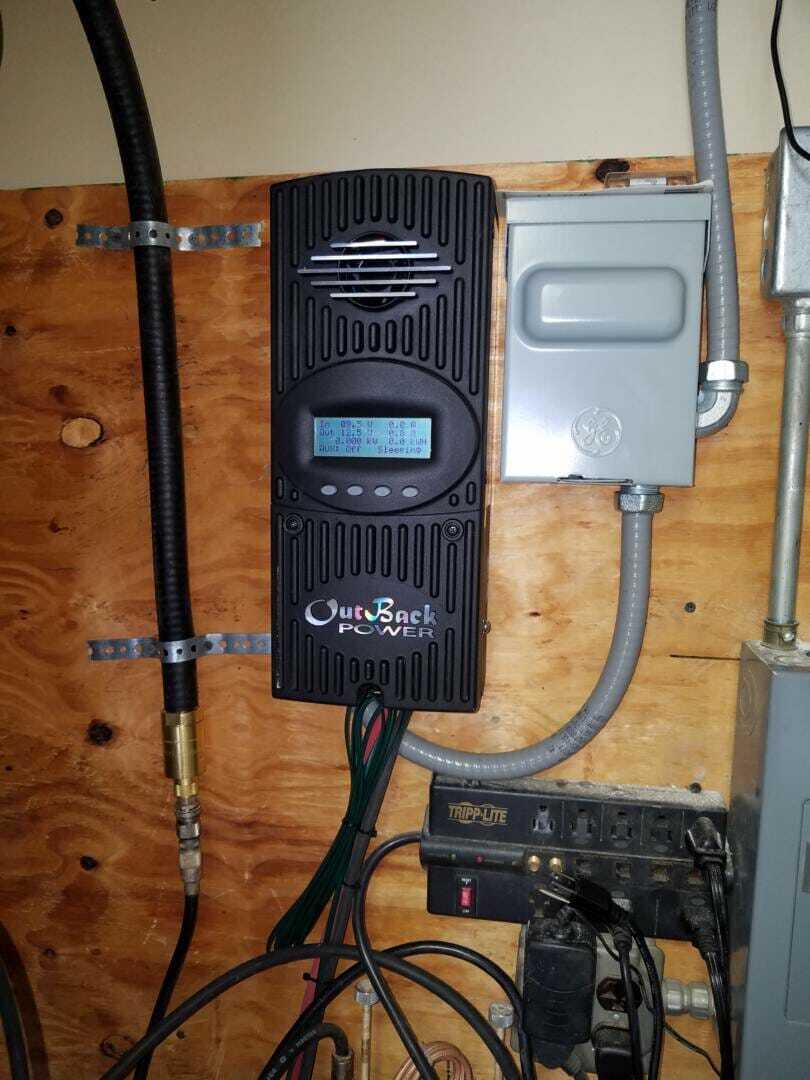
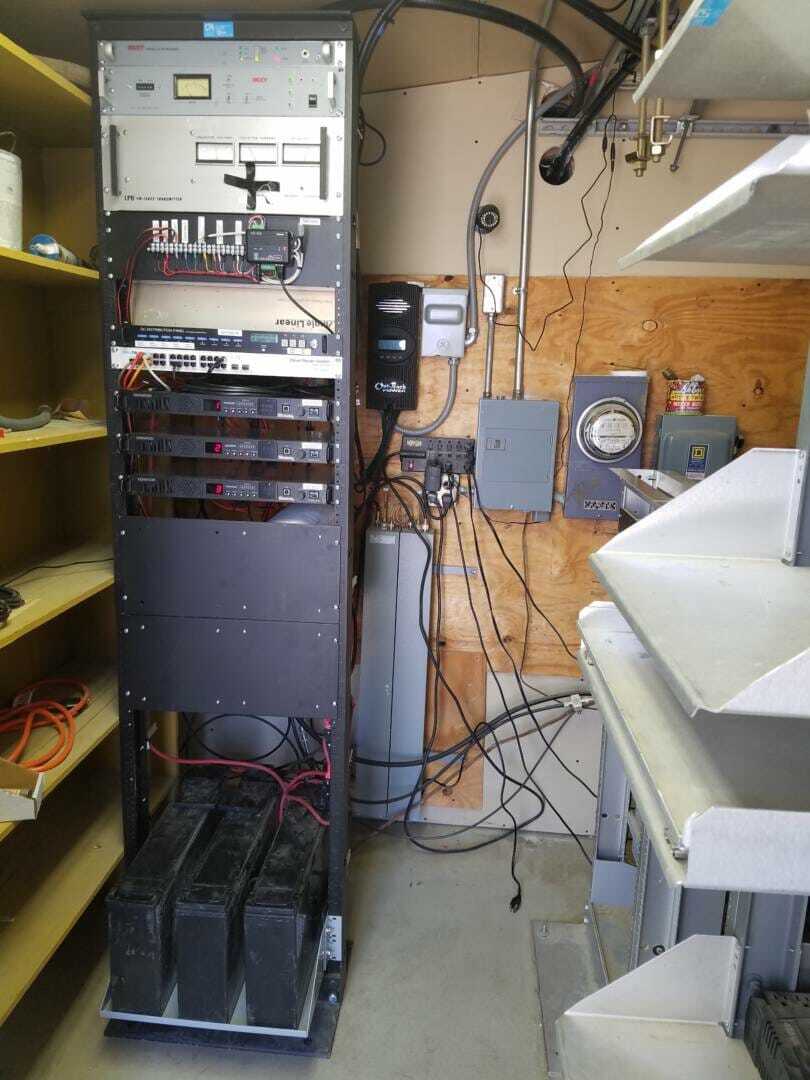
Mark and I were working inside the building to install the equipment. As in most of our installations, we place the batteries at the bottom of the rack. This acts as ballast to hold the rack from moving while giving stability to the upper portions of the rack. The space behind the rack was limited and tight, so when we moved the FM broadcast transmitter to the top of the rack, we needed to address the cabling and power connections to make certain that we did not knock them off the air and that we improved their situation so that they would not be upset that we moved their equipment. After we attended to their needs, we proceeded to mount our equipment in the rack. One by one, we mounted each piece of equipment working our way from the bottom to the top of “our space” in the rack. Installing equipment from bottom to top makes the job easier because each piece of equipment acts as a support shelf for the next piece of equipment that is to be installed above it as opposed to mounting from the top to the bottom where each piece of equipment must be individually supported by hand while attempting to mount that piece of equipment into the rack. Stacking equipment randomly generally does not work unless there is a rack elevation map that shows where each piece of equipment is supposed to be located. Without the map, it is very difficult to place each piece of equipment in the correct location the first time, so it is common to mount, then remount and remount again the equipment when using a random method of mounting the equipment. After about 2-3 hours to time, we had the equipment mounted and cabled. We now needed to install the solar panel charge controller which we decided to mount to the wall behind the equipment. This allowed us to wire in the batteries so that we could power up the equipment and determine that the equipment was working around the building. This gave Mark the opportunity to start working on the IP connection in the router and the network connection once the microwave dish was installed and aimed.
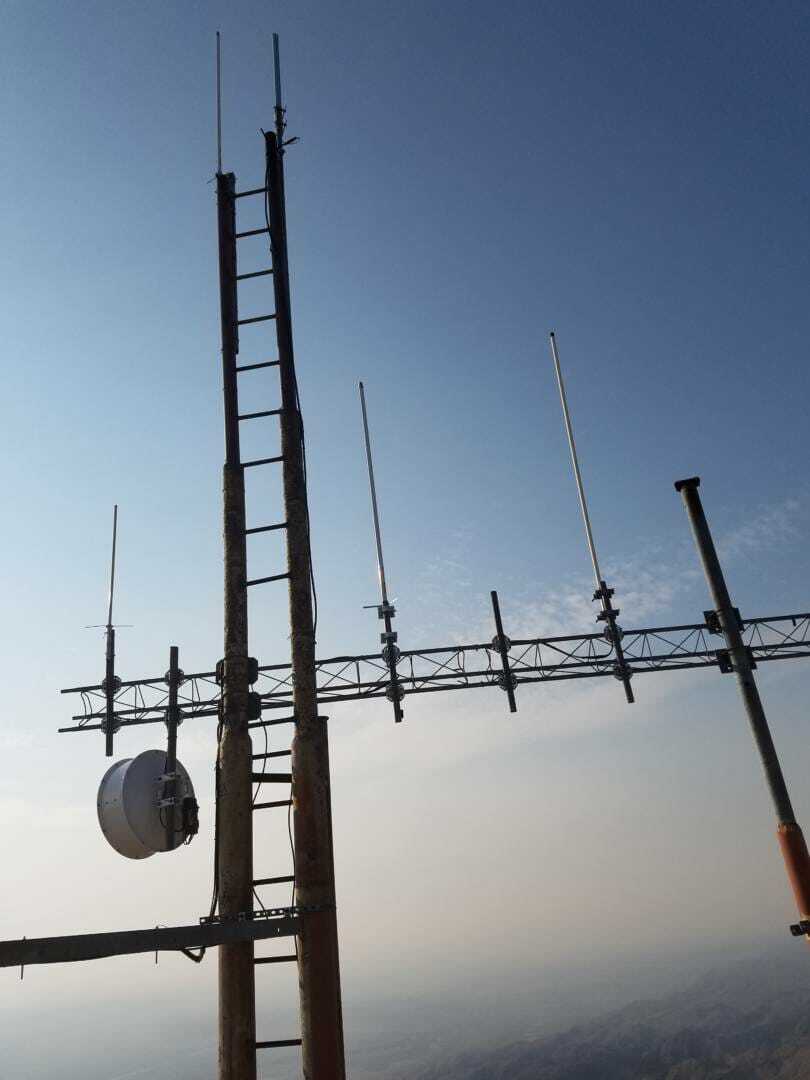
While we continued to work on the equipment installation, David and Chris were working outside to install the antennas. They had 3 antennas to install which included the transmit antenna for the mobile radio coverage, the receive antenna for the mobile radio coverage and the microwave dish antenna to bring in the network connection that we needed to connect the site to our radio network. They first worked to mount the microwave dish on the antenna structure. The microwave radio was mounted to the back of the dish so once the dish was mounted, they worked on aiming the dish at the connection point in Olancha. Once they had the dish aimed, they provided a temporary connection cable to the router so that Mark could work on configuring the network.
David and Chris continued by working on installing the other two antennas and antenna cables. This was a complicated and lengthy task which involved multiple steps to complete the job. Each antenna location was picked to optimize the performance of the equipment into the coverage area that we desired. We needed to install the hardware on the structure to facilitate the mounting of the antennas. Once the antennas were mounted, the cables had to be run to the antennas, connectors installed, jumper cables attached to the antenna cables, heat shrink tubing installed to prevent contamination by water intrusion and the cable clamps & cable ties installed to hold the cable on the antenna structure. The cable then needed to be routed from the antenna structure to the building and then brought into the building. This required routing the new cables along with the other cables that were brought into the building. We needed a method of bringing the cables into the building that would secure the building against weather intrusion, so we installed a cable entrance plate on the outside of the building that would accommodate our cables plus other cables that entered the building. This took the bulk of the day to accomplish.

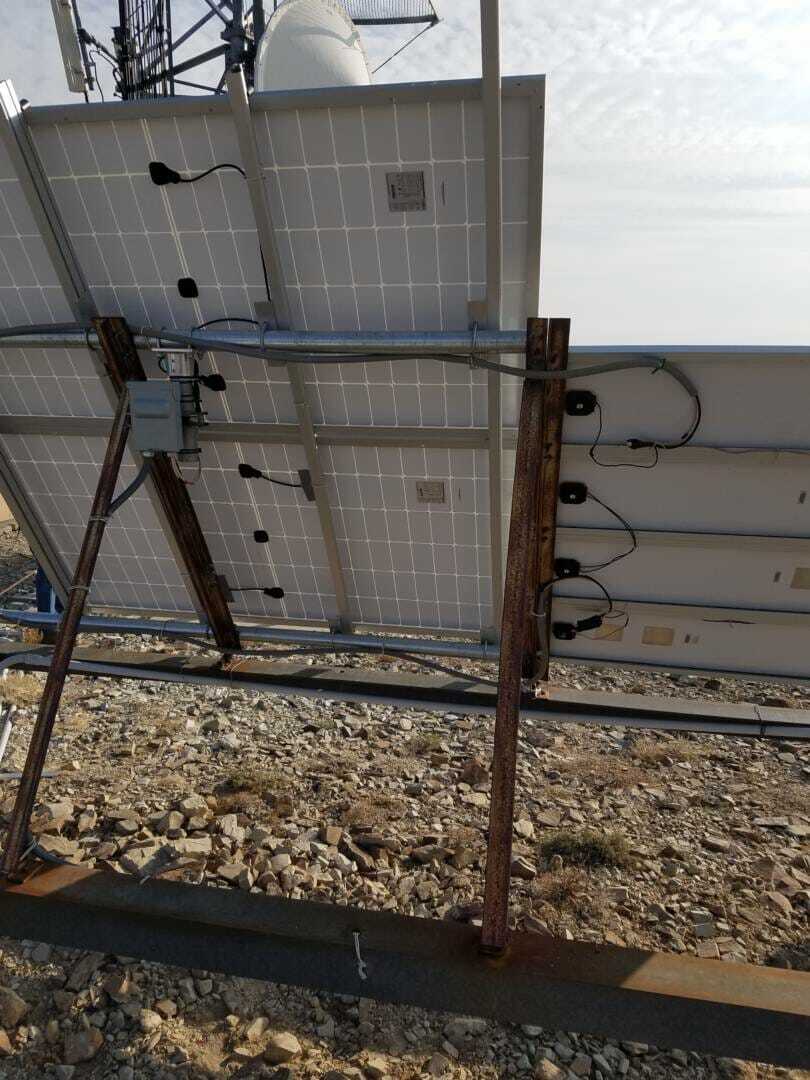
While they were working on the antenna and cable installation, it was time to start working on the solar panel installation. There was an existing solar array that had been installed which was in a sorry state of disrepair. However, this provided us with the framework required to mount our panels once we removed the existing panels. Initially this sounded easy compared to building a whole new structure to hold the new panels. However, when I tried to remove the old panels, I kept having trouble trying to figure out how to unbolt the panels. Everything I tried seemed to end up in a dead end because I could not get my wrenches, screwdrivers, nut drivers and other tools to get a single nut or bolt loose. I tried to disassemble the frame on the solar panel, but to no avail. I was working behind and under the solar array which limited my access and vision of the situation. After careful study with flashlights and mirrors, I discovered that all the bolts and nuts had been welded into place to prevent theft. This now presented us with a unique challenge to move forward. We looked at different solutions to the problem including bolt cutters, using a sawzall to cut the bolt head and the nuts attempting to force the bolts with more leverage, WD-40 or other lubricants, etc. The only solution that appeared to work was grinding off the nuts from the angle iron steel frame. So I set forth grinding off the nuts with my grinder which presented two new challenges. First, I was burning through charged batteries faster than I could charge new batteries. We mobilized all the chargers that we had with us and gathered all the batteries together to keep them charged. However, we needed another battery to run other power tools such as our hammer drill that was being used in the process of drilling holes to run the antenna cables into the building. The other challenge was to prevent the grinder from throwing debris into my eyes. In most cases, I had little to no choice as to how to hold the grinder and where I had to stand, sit or kneel. This caused the debris from the grinding wheel to be thrown at my face. I needed a safety shield over my face, but we did not have one. Safety goggles would also have worked to protect my eyes, but no one had a pair with us. We had several pairs of safety goggles at the office over 200 miles away or we could have left the mountain while taking at least 2 hours to go into town to locate safety goggles. The third choice was to use my prescription glasses as my safety goggles. So I proceeded to work on grinding the nuts that were welded to the steel frame while protecting my eyes with my prescription glasses. The end of the afternoon finally arrived and I had managed to grind off all of the nuts and removed all of the old solar panels from the one side of the structure that held the dead panels. All of this transpired while David & Chris finished getting the antenna cables into the building and connected to the radios. Mark finished getting the router configured and connected to the network. The office finished configuring the network for the new equipment and the entire site was now functional except for the solar array.
Now it was time to pack up and secure the site for the day, head down the mountain and go shopping for the materials that we were going to need the next day. It is easily an hour from the site to get back to town where we needed to find a store that would carry the materials we needed. There was a local hardware store that was reasonably well equipped with the electrical hardware that we thought we would need. We purchased some water tight flex conduit and connectors along with some other materials such as strut and associated hardware. After completing our shopping, we returned to the hotel to clean up and relax before dinner. We went out to the local fast-food joint and returned to the hotel where we proceeded to enjoy our evening. The guys bought a case of beer and worked hard to finish a considerable portion of the beer. Now it was time to sleep so that we could get up in the morning to get an early start.
We arose the next morning to another beautiful day in the eastern Sierras. After getting ready to hit the road, we emptied the hotel room from our belongings and checked out of the hotel. It was time for breakfast, gas, a lunch sandwich and plenty of cold water before heading up to the mountain. When we arrived, it was still cold because the sun had not had time to warm up the area so we started our work outside wearing jackets until it warmed up enough to shed our outer skins.
Today was our solar power day. We needed to get the solar panels mounted which required us to mount the hardware that would secure our panels. First, we had to drill holes in the framework to install the U-bolts that would secure the mounting pipes. After drilling the holes, we secured the horizontal pipes to the framework. Now we could mount the specialty aluminum rails that hold the solar panels and properly secured the rails. We then used the solar panel mounting hardware to mount the panels to the rails.
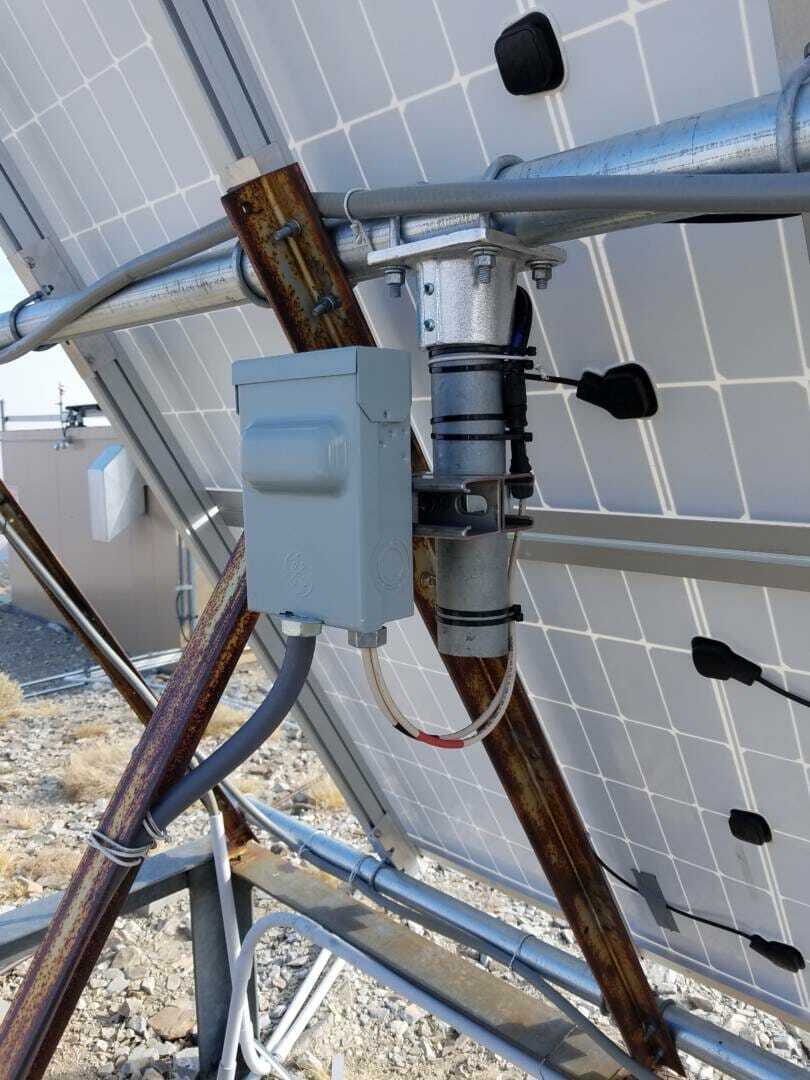
The next step in the process was to determine where to mount the cutoff switch boxes and design a method to mount the boxes. Having the strut gave us the flexibility to design the mounting that worked very well. While that was happening, others were working on pulling the wire from the solar panels through the underground conduit to the building so that we could connect the solar panels to the solar charger / controller. We could not get the snake to go through the flex for the entire length of the conduit because there were too many bends and too many cables already in the conduit. It became necessary to separate the conduit from one of the elbow connectors in two different places in order to get the cable fished through the conduit. (We had to also pull a CAT5 cable through the conduit at the same time because we needed to feet a CAT5 cable with an internet connection from our router to the other building which had conduit from the solar array to that building.) Once we had the wires inside the building, they had to be routed to the controller and properly secured to the walls so that nothing unfortunate would happen to the wires. After securing the wires, they were brought over to the solar controller so that they could be attached when we were ready, but first we wanted to get the cutoff switch end of the wires properly terminated. We attached the wires to the cutoff switch and proceeded to wire the cutoff switch to the solar panels using the water tight flex to protect the wires from the weather and from vandalism.
Now that the solar panels were connected, it was time to connect the wires to the solar charge controller. The cables had previously been connected from the controller to the batteries. Now we were connecting the wires from the solar panels to the controller. Before we finished the connections and proceeded to energize the system, we took some voltage measurements at the cutoff switch and at the end of the cables. After measuring the voltage, we verified polarity and attached the wires. The solar controller immediately started to function and charge the batteries. This pleased us to no end as we spent so much time installing the system and getting it to work.
The next task was to finish pulling the CAT5 cable through the underground pipe to the other building. This was to supply internet service to the building owner so that they could get a reliable connection. We attempted to fish our snake through the pipe from the solar panels to the other building, but that was another futile attempt. We had to disassemble that pipe like we had to do to get our solar panel wiring through the other conduit. This required digging up the conduit in places, breaking the conduit apart, pulling the wire through one section of the pipe at a time until we were able to get the cable through to the other side. We then had to reassemble the conduit pipe a section at a time until the entire pipe was reassembled with the new CAT5 cable in the pipe. The last task was to install the connectors on the cable and test it to verify that it worked.
Now it was time to clean up, pack up the vehicles and head down the mountain. We all the work we had done and all the tools we used, it took us at least 45 minutes to finish the clean up work. We made some final checks on the equipment because we did not want to come back for something we forgot to do while we were there. We locked up the building, verified everything was properly secured around the solar panels, walked the grounds to see if we left anything behind and then proceeded to get into our vehicles to drive down the mountain.
Thirty minutes later, we were back on the paved road and heading home. We turned left onto California Highway 136 and headed southeast towards Highway 190 where we turned right to head southwest to meet up with US395 in the Olancha area. We continued to check coverage as we drove south towards Los Angeles attempting to verify that the site provided the coverage that was predicted. At every turn of the road, we were pleased to find that it continued to work as we headed south towards Olancha, Cartago and beyond. The coverage from the site ended around the Little Lake area where it was predicted to end and the coverage from El Paso Peak picked up. So now we had continuous coverage from the Mexican border all the way past Lone Pine and north past Independence for several miles. The trip was a complete success and now we could boast about our new coverage. It was another successful installation for our ever expanding Diga-Talk network.