It was a typical summer day in 2019 in August when we started the installation of the new site on top of Casa Diablo which is at the top of the grade north of Bishop approximately 15 miles north of the town of Bishop, the largest city in the eastern Sierras on Highway US395.
The installation plan was for the four of us to head up to Casa Diablo after we finished our work at Conway Summit. We had packed our three vehicles before we left Los Angeles with the repeaters, transmit combiner, receiver multicoupler, power distribution panel, router, site monitor, power supply, cables for the batteries, sync, oscillator, receivers & transmitters, equipment rack, antennas, antenna cables, brackets, clamps and anything else that we needed, so we were ready to head out in the morning once we finished straightening the antenna at Conway.
Before we attempted to go to the site, we had sent “The Wrecking Crew” as we called them to prepare the site for the radio equipment. The crew consisted of 2-4 people depending upon who was available at the time and they did the mechanical work at our tower sites to get them ready for occupancy by radio equipment. They would install insulation, wooden backboards, repair roofs, fix doors and locks, repair generators, install air conditioners, install entry plates for cable to enter the building, install racks and many other tasks. They were sent to the site which is owned by another party to get the site ready for our equipment to be installed. The site is solar powered since there is no electricity there from the power company, so we needed a battery rack built for a large number of batteries and had them bring the batteries to the site. We also needed a structure built to handle our solar panels.
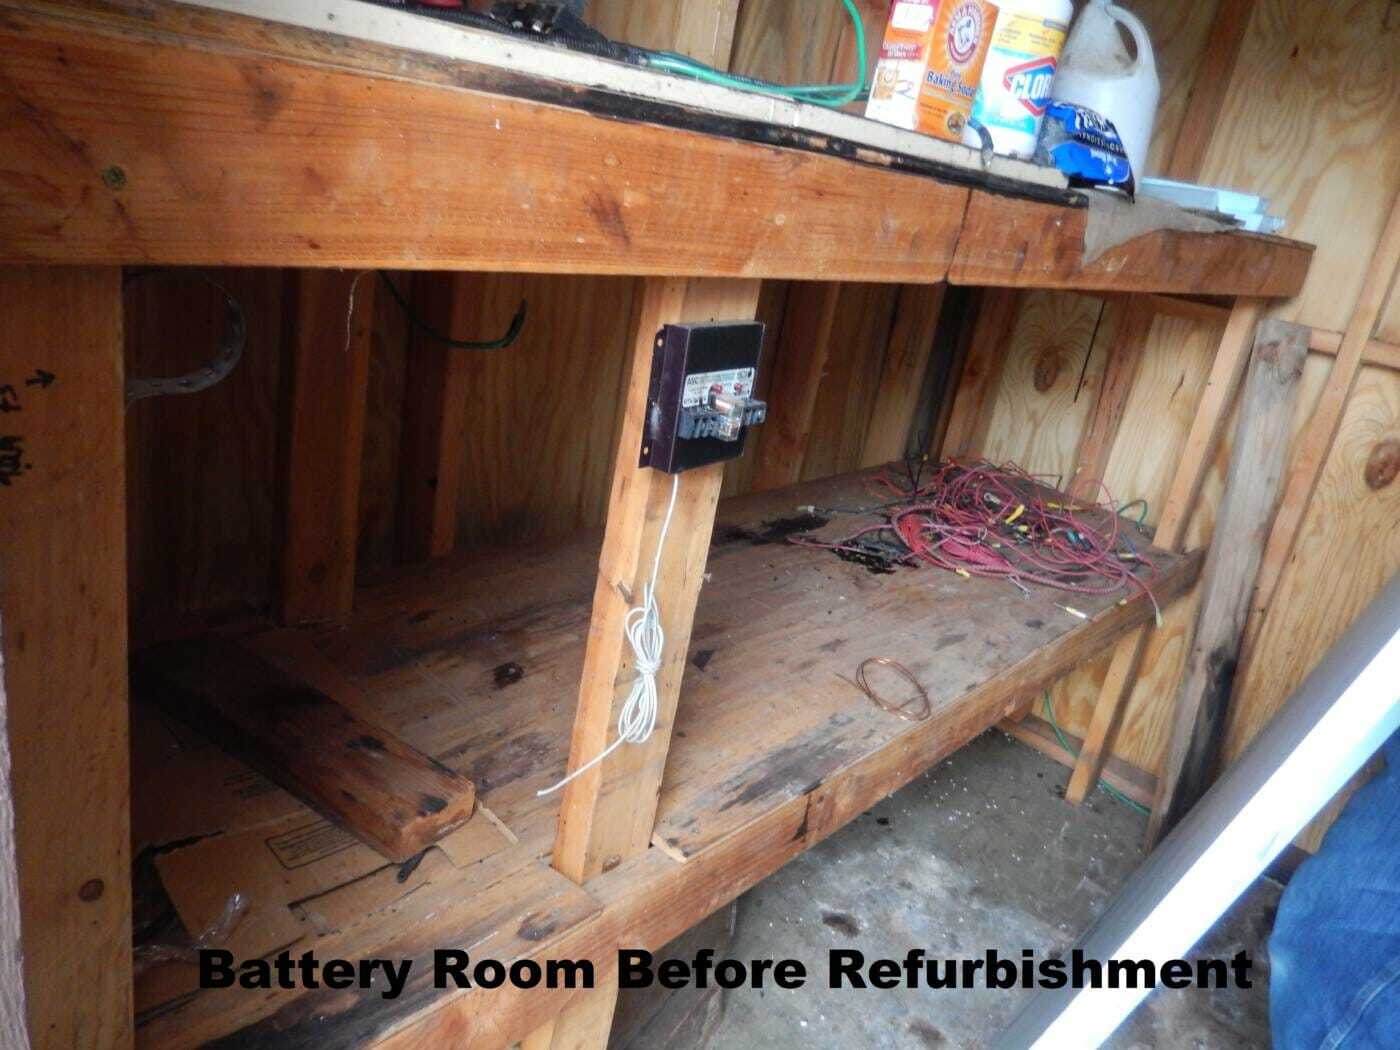
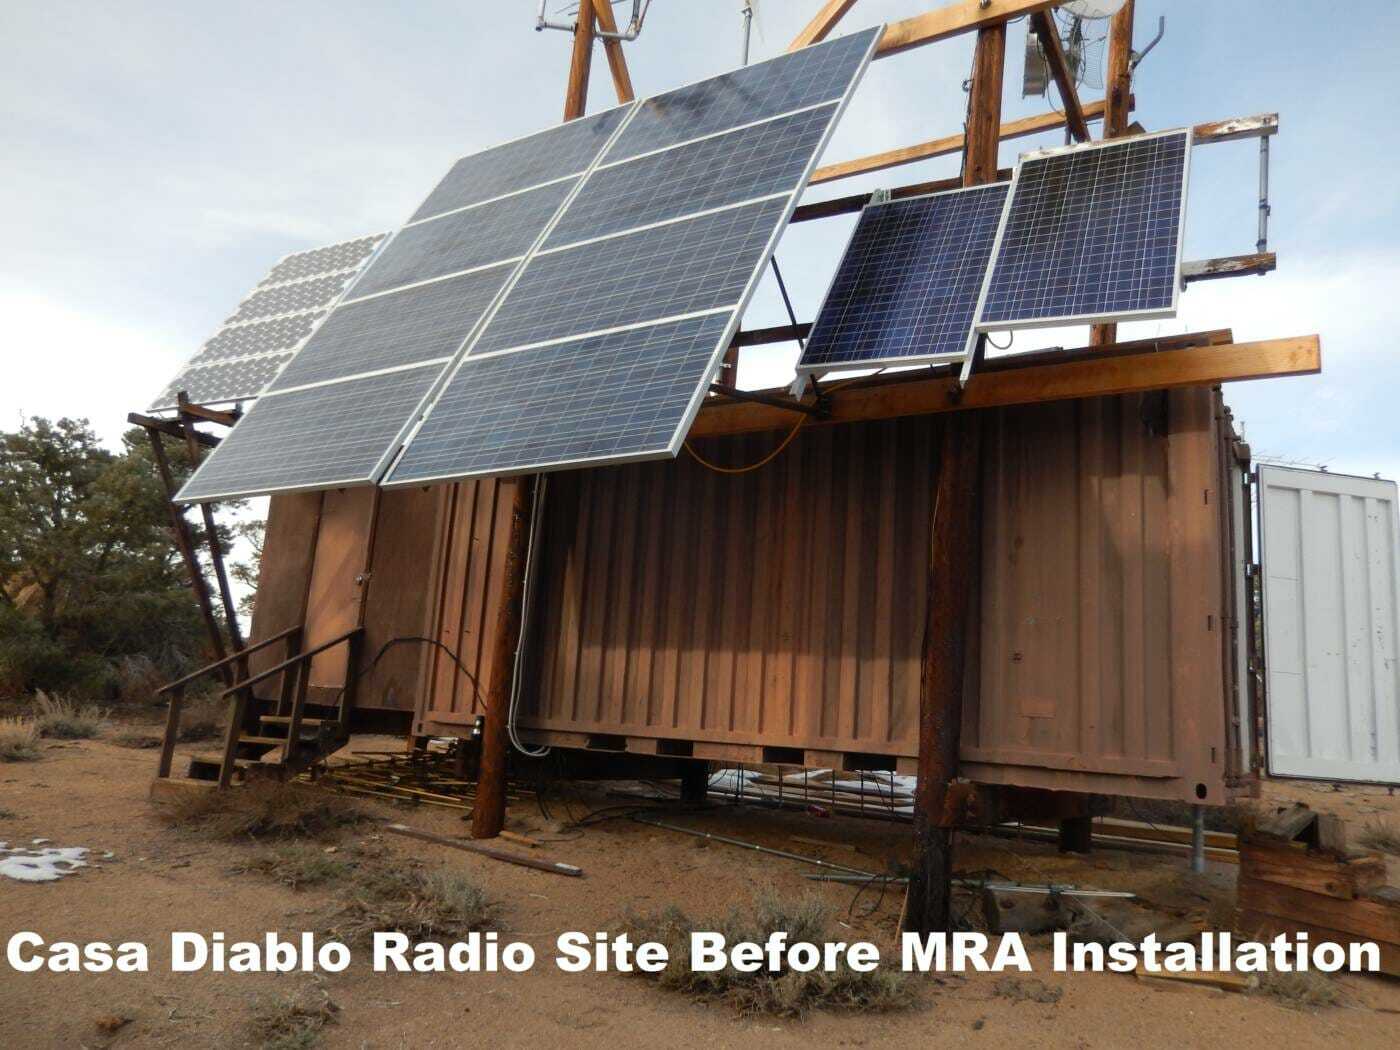
The site consisted of a cargo container that was raised off the ground which made access during heavy snow much easier and would help to keep the snow from melting and penetrating into the building which could ruin the equipment. When the crew arrived to build the battery system, it was determined that the floor needed to be reinforced to handle the weight of the batteries. Further inspection determined that the entire battery room (which was built out of wood as a 7 feet extension of the cargo container) was severely rotted from the years of exposure to the battery acids and the sheer weight of the batteries necessitating extensive repair. So the crew mostly dismantled the battery shed and rebuilt it. They built stairs from the ground to climb up to the floor level to replace the old rotten stairs that were a safety hazard both in front of the battery room and also built some stairs to the main room of the cargo container. They also built the solar panel framework and installed the solar panels to power the equipment. After building the battery rack, they had trucked 18 of the 40 batteries to the site and had placed them in the battery rack. The batteries had been stored in Bishop, so the crew picked up the batteries that had been made available to the wrecking crew and brought some of the batteries to the site while the rest of the batteries would need to be brought up to the site at a later time. Having the benefit of these basic amenities made our work of installing the radio system and getting it working a much easier and less challenging task. In spite of the previous work that had been done, we still had a challenging installation ahead of us for the next two days.
We headed to Casa Diablo after completing the work at Conway Summit. We headed south from the Mono Lake area on US395 passing June Lake, eventually reaching the Mammoth turnoff. We passed Mammoth and continued south past the Mammoth airport to Benton Crossing Road where we turned left passing the wooden church to head to the site. We proceeded to go in the general easterly direction as the road made its many turns changing direction considerably multiple times to the point where it was almost impossible to be certain which way we were headed. Eventually, we reached Casa Diablo Mine Road and turned right onto the dirt road to head south towards the site. We traveled on the road for many miles until we reached the turnoff to the site which was USFS road 134C. We reached the first of 4 intersections where we had to make a choice as to the correct route to the site. We tried the left fork and traveled for about 5 minutes when we decided that this was not the right way to the site. So we turned around and headed back to the intersection and proceeded to head further up the road towards the site. We now arrived at a Y intersection and decided to take the right fork which led us into another Y intersection where we tried the left fork which quickly ended in a dead end. We then turned around and tried the right fork which drove around the side of the mountain far below the site and started wrapping around the other side. We decided that both of these routes were not the way to the site so we turned around and headed back to the 2nd intersection to take the left fork to get to the site. Unfortunately, there were still two more intersections which had both the right way and the wrong way for choices. We tried to use our cell phones to call the site owner, but to no avail, so we continued with our quest to find the right way to the site. We reached the next intersection and of course, we took the wrong way which was a very rough dirt road which had very little clearance and almost no way to turn around. We traveled this road for a while until we decided that it must be the wrong way and then we had to find a way to turn around. This turned out to be challenging, but eventually we found a place where it was possible to turn around and head back. David followed me and found it more difficult to turn his pickup truck around, but eventually was able to do so. Unfortunately, there was a spot in the road that had boulders on both sides of the road and his truck did not make it through that point unscathed. We eventually made it back to the intersection and took the other fork. Now we approached another intersection and decided to go straight instead of turning left. Finally, we went the correct direction the first time and quickly approached the tower site. Most tower sites can be seen a long distance before one reaches the site, but this site cannot be seen until you are within 100 yards from being there which made taking the correct fork in the road more difficult than at most other sites. When we finally arrived at the site, we stopped to give thanks for our safe arrival at the site before proceeding with the work.
The first thing we did was to familiarize ourselves with the site by walking around the building to see what had been done since I was there to scout out the location 2 years earlier. We walked around the site and looked at the solar panel installation that would ultimately power our equipment along with viewing the new stairs that we would use to access the building. We then used the combination to open the building to access the site. We looked inside the main room which was inside the cargo container and then opened the battery room to look at the battery rack and the battery installation. After spending a few minutes assessing the situation, we developed a plan to move forward with the installation which included unloading the equipment and moving it inside the cargo container where it would be installed. We also unloaded the additional batteries and brought them into the battery room.
We started working several different aspects of the installation. We needed to build the battery bank, install the radio equipment in the building, build the solar array, install the solar controller / charging system, build the antenna structure, install the antennas, install the antenna cables and make the network connection. Each of these tasks was a considerable amount of work which would challenge us, but we knew that we were up for the job.
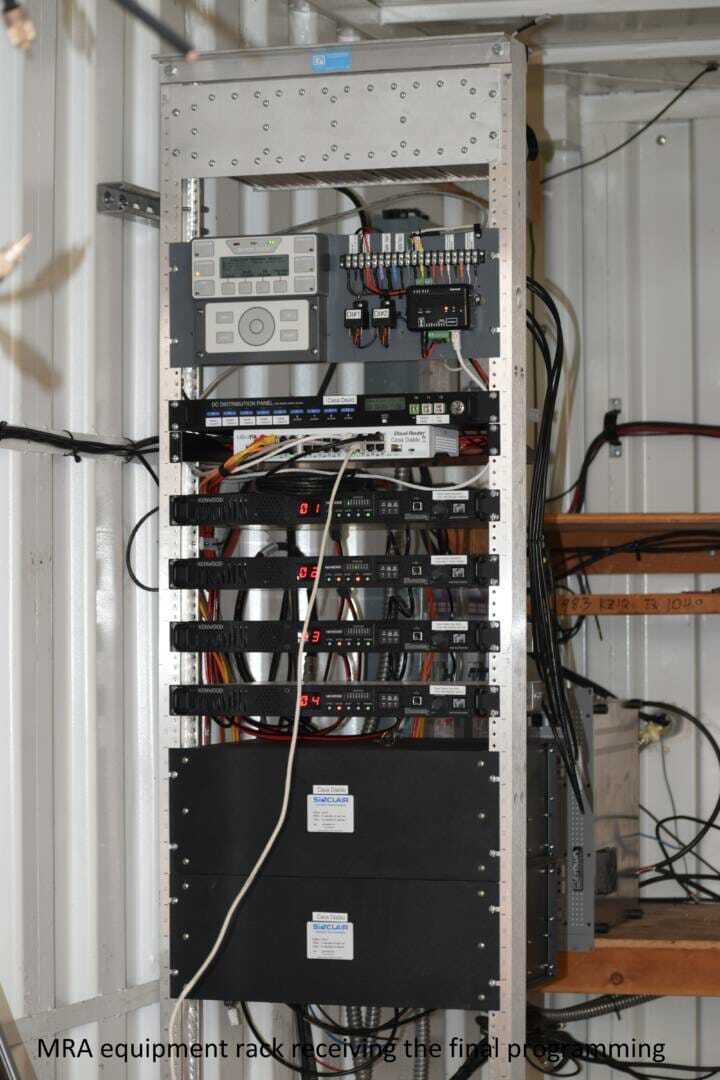
My main task was to build the battery system and to assemble the radio equipment into a working system. I started with assembling the radio system once Nick had the equipment rack assembled and installed. I went through the usual process of starting at the bottom of the rack, but this rack did not have any batteries or battery tray since all the batteries were in the battery room. The rack did have plenty of other equipment to mount and cable. We did have a diagram of how the equipment was supposed to be placed in the rack, so this was not much of a guessing game to assemble. Piece by piece, I installed the equipment in the rack until all of the equipment was installed in the rack. I then obtained the package containing the cables for the site so I started the process of cabling the equipment. After a couple of hours, I had the system fully cabled and ready to power up, but since we did not have the solar system or battery system built, there was no way to power the equipment at this time.
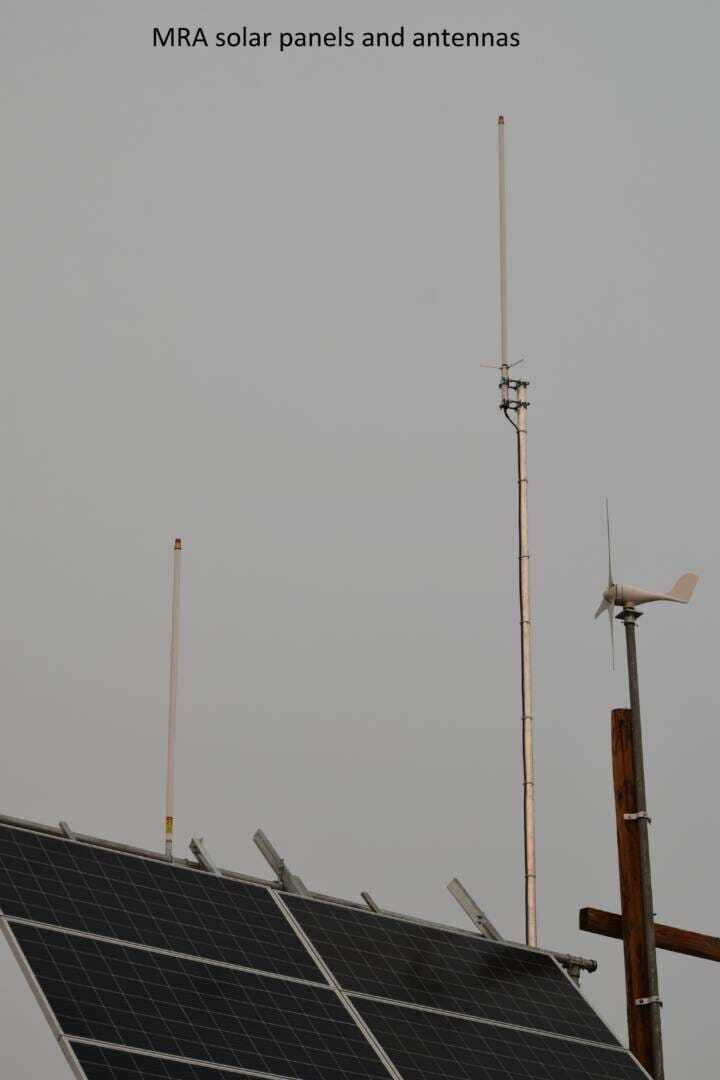
While I was working on the equipment, David, Chris and Nick were working outside on the task of building the antenna structure, wiring up the solar panels, installing the antennas and installing the antenna cables. Each one of these tasks would take hours for the three of them as they worked through all the issues that were presented to us during the installation. Their first task was to design the antenna support system and get that installed. They then moved on to mounting the antennas and installing the antenna cables. The antenna system mounting design required fabrication of various materials including antenna clamps to create a situation where we did not interfere with the operation of the solar panels and did not create a situation that would cause ice to form and drop onto the solar panels which could easily crack the panels. We also needed the antennas to be high enough to clear the local shrubs and trees so that we would get decent transmission and reception from the site. So the guys worked diligently on their work while I was inside working on the equipment and then working on the battery system.
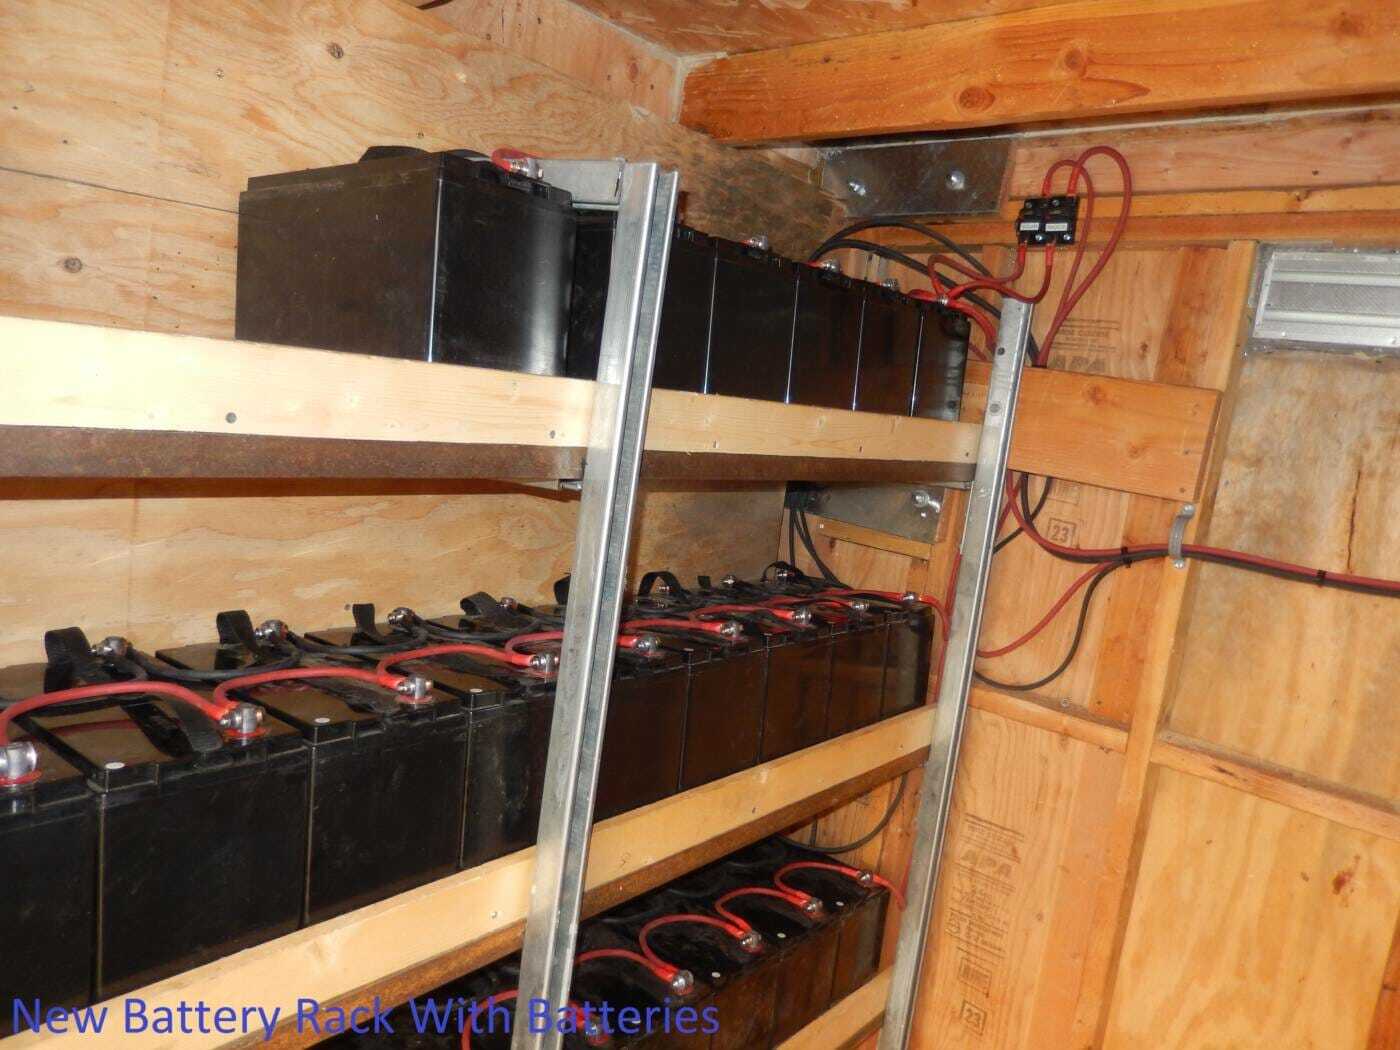
It was later in the afternoon when I started working on the battery system. Although many of the batteries had already been placed in the battery rack, we brought up another 10 batteries to total 28 batteries. We were still short another 12 batteries which we did not have at the time which would total 40 batteries which would provide 4000+ amp hour of power, enough to last for at least 2 weeks without any solar charging. So now it was time to start putting the battery system together. The battery rack was built out of wood and strut against one of the walls in the battery room. There were 18 batteries already in the rack. After studying the rack while taking measurements and calculating how many batteries would fit in the different parts of the rack, I had to determine the battery cable distribution system. We had regular battery jumpers to connect 2 batteries together that were immediately adjacent to each other. However, the batteries were distributed over 4 tiers which meant that I needed many jumpers that I did not have to go from one level to another. However, we anticipated this issue so we had the battery cable, connectors, heat shrink and terminal crimper with us so that we could make any jumper that we needed. So I figured out what we needed and I assigned the task to Chris to make the battery jumpers that I needed since he is the one who typically makes our battery jumpers when he is at the office. So while Chris was making the new jumpers, I was arranging the batteries in the rack which was no insignificant task. Each battery weighed about 80 pounds and there was little space to maneuver the battery into the rack. In addition, the top tier of the battery rack was close to the ceiling which was cramped space wise and requiring me to lift heavy batteries above shoulder height. Another issue that I had to deal with was the lack of variety in battery hardware bolt length. Most of the batteries had only one or two jumper cables. The batteries on the end of a string had one cable while the cables in the middle of the string had two jumpers per terminal. However, at the location where the strings came together, we had 6 jumpers on the battery terminal which meant that we needed longer bolts to handle the numerous battery jumpers. All the hardware we had was 5/16” x 1 ¼ for the batteries which was OK with 1-3 jumpers. However, with 4 or 5 jumpers on the battery terminals, the bolts were too short so now it was necessary to hunt around the site to see if we could locate some longer 5/16” bolts. We search around the site and could not find any longer bolts that were not in use, but we did find some in the solar panel structure that were 5/16 x 1 ½”, but the longer bolts were not needed in most of those locations. So we proceeded to trade out the longer bolts for the shorter bolts which gave us the longer bolts we needed to complete the battery system.
While I was working on the batteries, the guys continued their work on the antenna system and solar panel system. They had managed to get the antenna structure built and attached to the solar panel support system. They were then able to mount the transmit and receive antennas to get them ready for attaching the antenna cables.
The end of the day had arrived and it was time to head back to the barn. We were staying at the house in Mammoth during the job, so we left the site and headed out to the main road. We turned right to head north on Casa Diablo Mine Road for about 10 miles until we reached Benton Crossing Road. We turned left on Benton Crossing Road and headed basically west as the road made its many changes in direction until we eventually reached US395 just south of the Mammoth Airport. We turned right and headed north to the Mammoth exit where we went into town and over to the house where we would clean up, rest and eventually head out to a restaurant for dinner.
We got up early the next morning because we wanted to finish at the site and head south to go home. So we got ready to leave the house and packed our suitcases so that we could load them in the vehicles. We unplugged the water circulation pump, turned down the heater both upstairs & downstairs and turned down the water heater to vacation status so that it will conserve energy until we return. We then locked the doors and exited the house to our vehicles where we proceeded to head over to the New York Deli go get some breakfast before heading to the site. After breakfast, the guys headed to the site while I made a parts run to the Do-It-Center to pick up a few items that we felt would be a good idea to have with us to complete the installation. I shopped quickly and headed over to the site the same way we got there yesterday. When I turned off of Casa Diablo Mine Road, I called the guys on the radio and found that the guys were lost while trying to get to the site because they did not remember the correct turns that had to be made once leaving the main road from yesterday. So I directed them back to a point where they made the wrong turn and talked them through to the site. So I arrived 5 minutes before all of them even though I stayed behind to purchase some additional materials.

We went back to work at the site performing our respective tasks. I went back to work in the battery room trying to finish the battery system. It takes a lot of cable to hook up 28 batteries. Also, I had to run the cables from the solar charge controller in the main room securing the cables across the wall to the pipe that we installed to bring our cables into the battery room, then secure the cables across the wall from the pipe to the opposite side of the room where the battery rack was located. We also installed a DC circuit breaker in line in case there was a short circuit to prevent meltdown of the wiring and a possible fire in case something went wrong. Now that I had the battery cables over to the battery rack, it was time to make the final connections to the battery bank and make certain that all of the bolts were tight.
While I was finishing up the battery system, the guys were now running the antenna cables. They attached the cables to the antennas that they had mounted the day before and ran the cables under the building, bringing the cables up from under the building into the radio room. They then routed the cables over to the radio equipment and installed the connectors on the cable. Now it was time to check the antennas with our Anritsu antenna tester to make certain that the antennas were good and all the connections were secure. The antenna tester sends out signals on different frequencies to verify the performance of the antennas throughout the entire range of frequencies that we use in the system so that we know that the antenna system is solid and performs correctly. Once we had those connections verified, I gave the OK to seal the connections so that weather would not destroy the integrity of our connections. We use high performance heat shrinkable tubing that has a waterproof sealant that softens and then liquefies when the tubing is shrunk and completely seals the connections against water intrusion. We have been using this product for over 30 years and we have never had any of our connections allow water to leak into the joint, so we have a high level of confidence that once it was sealed, we would not have to come back to fix the connection.
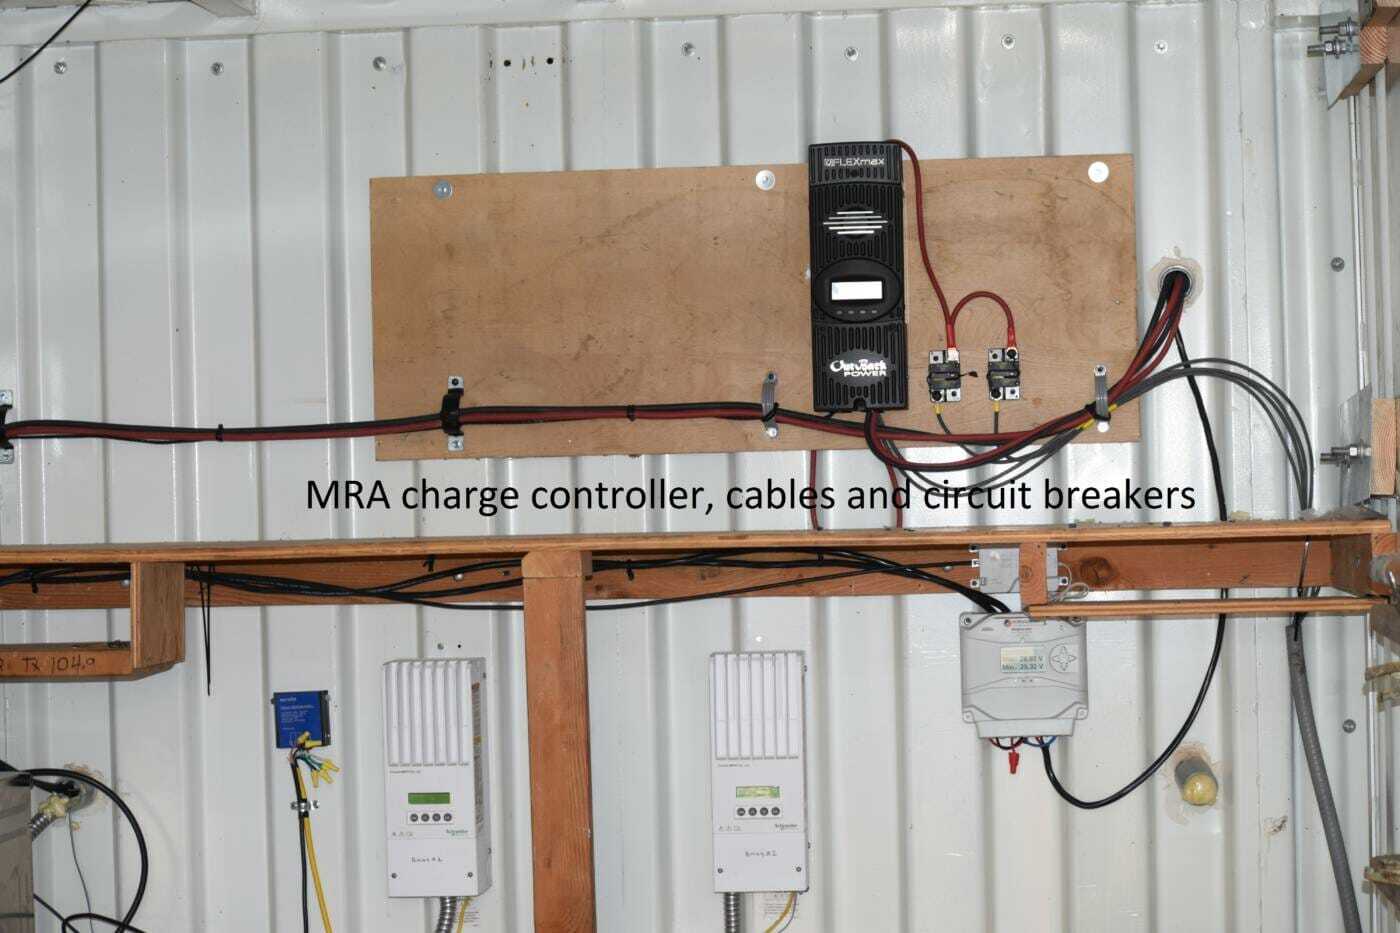
David was inside the main radio room attaching the solar panels to the solar charge controller because he and the guys had finished making the connections to the solar panels outside. He routed the cables from where they came up from under the building and entered the radio room. He then secured the cables to the wall and routed them over to the solar charge controller. After much preparation, David wired the cables from the solar panels to the cutoff switch and from the cutoff switch to the solar charge controller. We then got out our volt meter to verify the connections and the polarity of the solar panels to the charge controller.
It was now time to fire up the system and see if the smoke rises. There is an old saying that all electronic and electrical components contain the element of smoke. When you do something to cause a part to release its smoke, it never works the same. Even if you gather up all the smoke, compress it and force it back into the component, it still never works the same way. So our goal is to turn up the system without releasing the smoke, so we made several checks before we energized the system. Once we were convinced that the smoke would not be rising, we threw the switch and watched the system fire up and start its boot up cycle. We were pleased. The system completed its boot cycle and the control channel came on the air. I got my portable radio out of the car and found that the radio logged onto the site.
So now we were on the air, but we needed to get connected to the network. We had to run a CAT5 cable from our equipment to get the internet connection. We plugged into the equipment and plugged into our router. David logged into the router to check the programming and get it configured so that it would recognize the internet. David worked with our internet service provider to get the configuration consistent with the programming from the internet service provider. After 15 minutes, the programming was finished and we were now connected to the network. After a few more minutes, the network connection was fully functional with the network recognizing the new site. We were now able to talk to the office from the site which was north of Bishop and south of Mammoth, about 300 miles from Los Angeles.
The job was finished and it was time to pack up our tools, test equipment and left over supplies. We swept the floor and tried to leave the place cleaner than when we arrived. When I was in high school, my electronics teacher had a saying, “Never let it be said and said to your shame that it was cleaner here before you came!” We have always worked by that philosophy whenever we do a job whether it be a radio installation in a vehicle, a DAS system installation, base station installation, repeater site installation or any other type of work that we perform. We locked up the building and did a final visual inspection at the site to be certain that we had not missed anything. It is a long drive back to Casa Diablo to retrieve any test equipment, tools or materials that we leave behind.
We were all anxious to head back to Los Angeles and go home for the weekend. We headed out from the site and worked our way to the main dirt road. We turned left on Casa Diablo Mine Road to head south towards Bishop. Another successful installation and now we were checking coverage as we drove south. The coverage was great and performed as expected. The portable radio coverage was solid heading south until we reached the Poverty Hills at which time it took a mobile radio to have reliable coverage.
Many hours later, we arrived home and went to bed knowing that we had a successful trip.