It was May 9th in the spring of 2023 when we finally had the time, resources, and scheduling window needed to build and install the equipment for the Box Springs radio site. After the necessary planning and preparation were completed, the installation marked an important step in strengthening MRA’s radio communications presence throughout the Inland Empire. Projects like this require careful coordination, from preparing the equipment and verifying site access to making sure the system is properly installed, tested, and ready to provide dependable service once brought online.
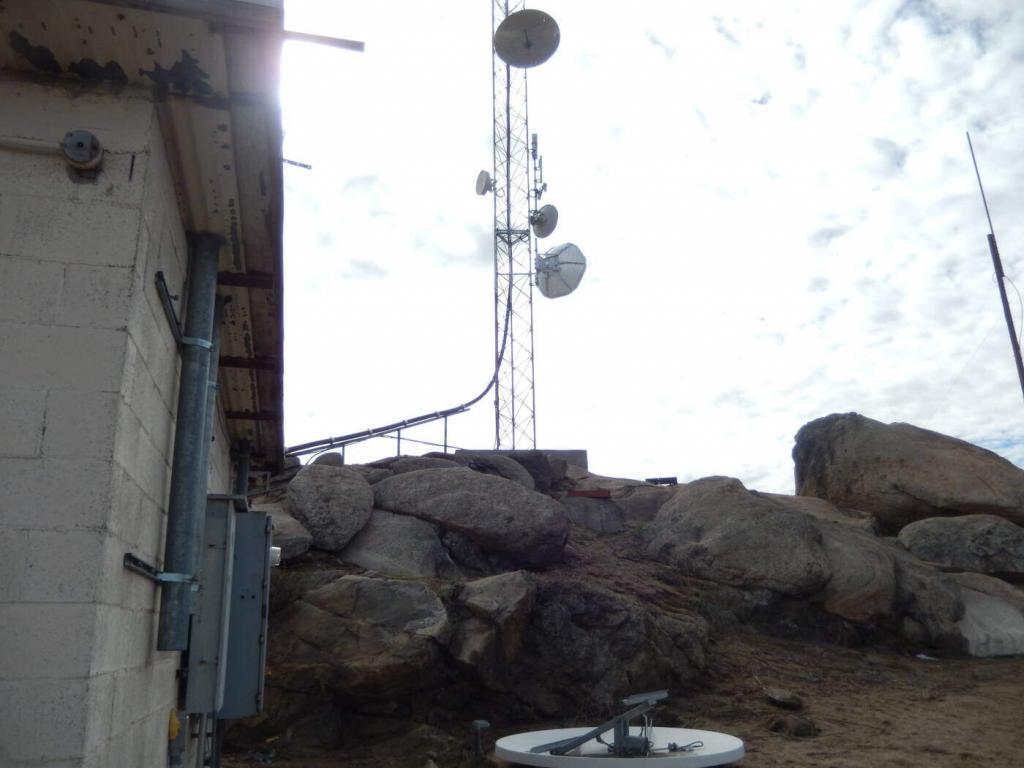
Box Springs is located approximately 1.3 miles due north of the intersection of Interstate 215 and California Highway 60 heading east. Its location makes it a highly valuable radio site because of its position above the surrounding communities and transportation corridors. In radio communications, elevation and line-of-sight are critical factors, and a well-placed site can dramatically improve signal strength, reliability, and usable coverage across a large area. The Box Springs location is especially useful because it overlooks key portions of Riverside and the surrounding Inland Empire region.
The site’s primary coverage area is Riverside, but its reach extends well beyond the city itself. From this location, coverage is available across much of the Inland Empire, stretching south toward Temecula and east toward Beaumont. This makes the site beneficial not only for users operating in Riverside, but also for those traveling or working across nearby communities, business districts, industrial areas, and major highway routes.
By adding Box Springs to the overall MRA network, the system gains improved coverage density, stronger signal availability, and better communications reliability in areas where coverage quality can be affected by distance, terrain, buildings, and elevation changes. It significantly enhances the overall quality of coverage offered by MRA in the Inland Empire area, helping provide a more consistent and dependable radio experience for customers who rely on clear communications throughout the region.
It was a Tuesday morning when it was time to head to the mountain for the long delayed installation. David, Nick and Chris were ahead of me and arrived at the mountain about 30 minutes before I arrived. They wasted little time getting started by unpacking their tools and unloading the equipment which they managed to move into the building. The site was accessible via 2WD vehicles, so we brought the equipment to the site fully assembled and tested from our shop so that when we hooked up the equipment to power, antennas and internet, there was a high probability that the site would be fully functional.
The road to the site was a well graded dirt road that had suffered some significant winter damage. In between sections of really good dirt road were some deep ruts running either parallel to the road, at a diagonal across the road and rut channels cut across the road by running water making it a bit challenging in certain places. In spite of the problems with the road, it still was in relatively good shape for most of the road but the areas with problems meant that we had to be conservative when driving on it.
Upon my arrival, Jon, David, Nick and Chris were working on getting the antennas installed on the tower. I concentrated on finishing the installation of the equipment inside the building with the help of Nick while he was splitting his time between helping with the antenna installation and helping with the equipment installation. The equipment rack needed to be bolted down to keep from being knocked over during an earthquake. The site is not far away from the San Andreas earthquake fault so being prepared for the earth to shake is an important issue. After securing the rack to the floor with concrete anchors, it was time to install the battery tray to hold the batteries. The large heavy duty battery tray was used for these batteries due to their size and weight which takes about 20-30 minutes to assemble into the rack. After the assembly was finished, it was time to place the batteries in the rack which weighed about 170 lbs for each of the three batteries.
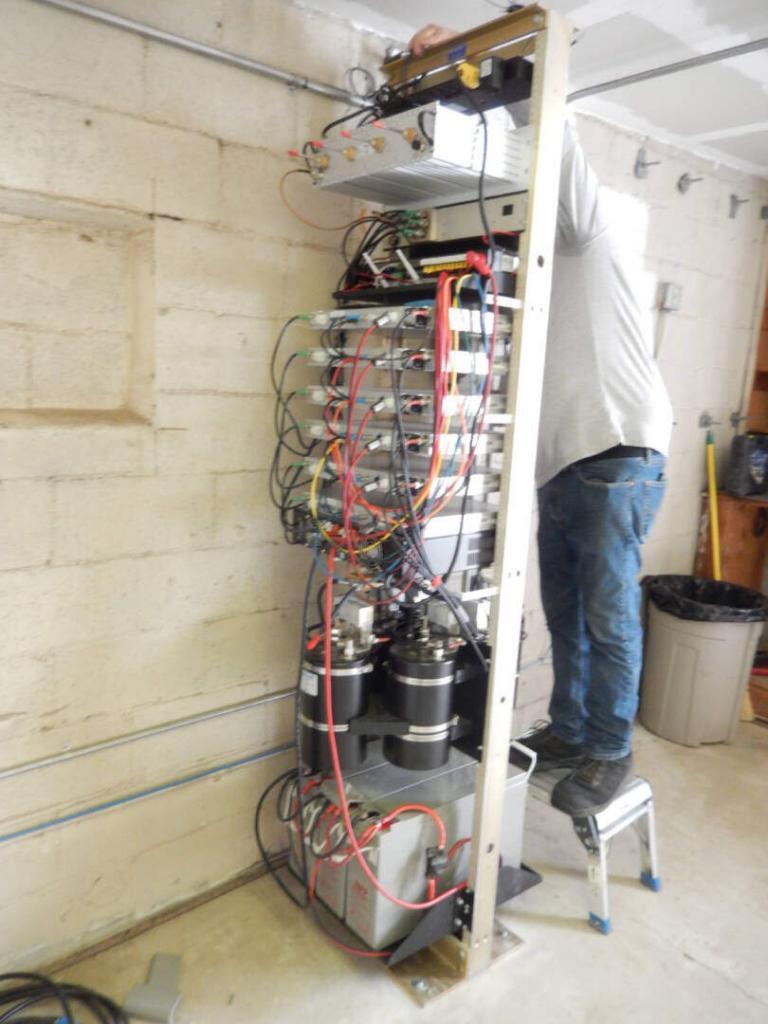
Now it was time to wire the batteries to the power supply via the circuit breaker to make certain that the system is not taken down by short term power outages which can glitch the memory in the repeaters and cause them to operate improperly. We have enough battery capacity to run the repeaters for at least 24 hours to help mitigate most power outages, but any time there is an extended outage, customers will find a way to be unhappy with our failure to anticipate the worst possible scenario.
Once the batteries were connected, it was time to attach the battery charger which required more cabling and time. We then hooked up the AC power to the equipment and fired it up. We also began to work on the internet connection to connect the site to the rest of the network. We plugged into the jack that was supplied ahead of time to provide the internet service, but we immediately had trouble with the connection which needed to be resolved by contacting the internet provider. It took about an hour for them to resolve the issues with the connection so eventually we had our equipment connected to the rest of the network. This allowed us to test the site even though we did not have any antennas connected to the equipment. This meant that we had really good coverage for up to 100 feet from the equipment and we were able to test the connection to the network and verify the operation of the site.
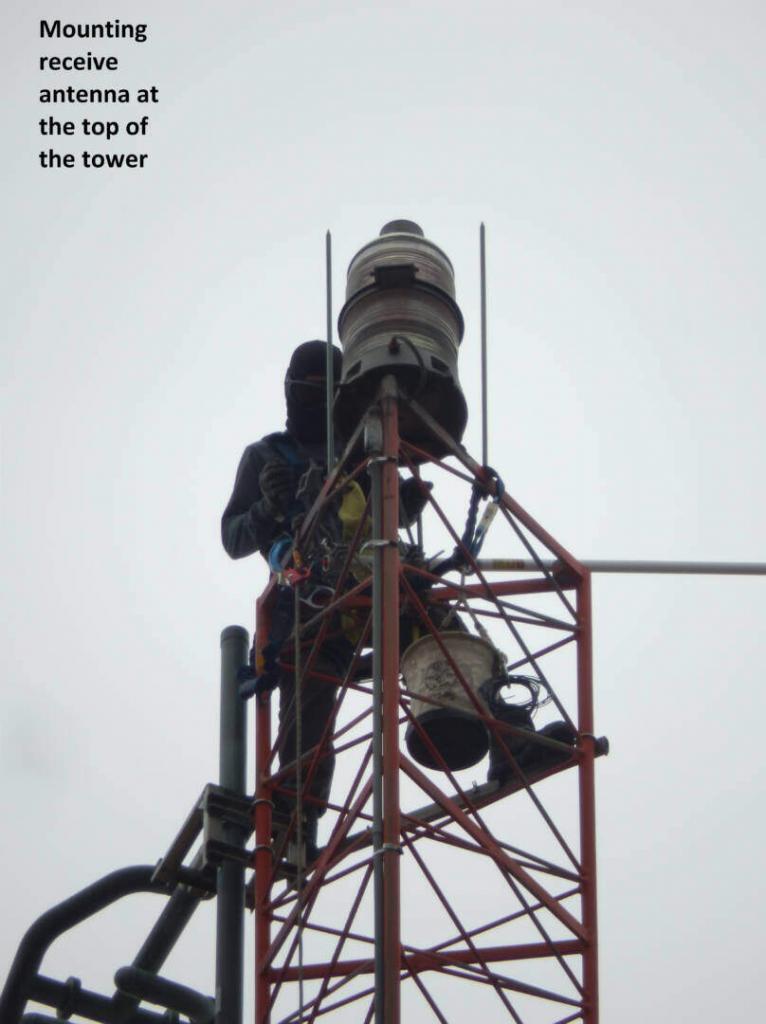
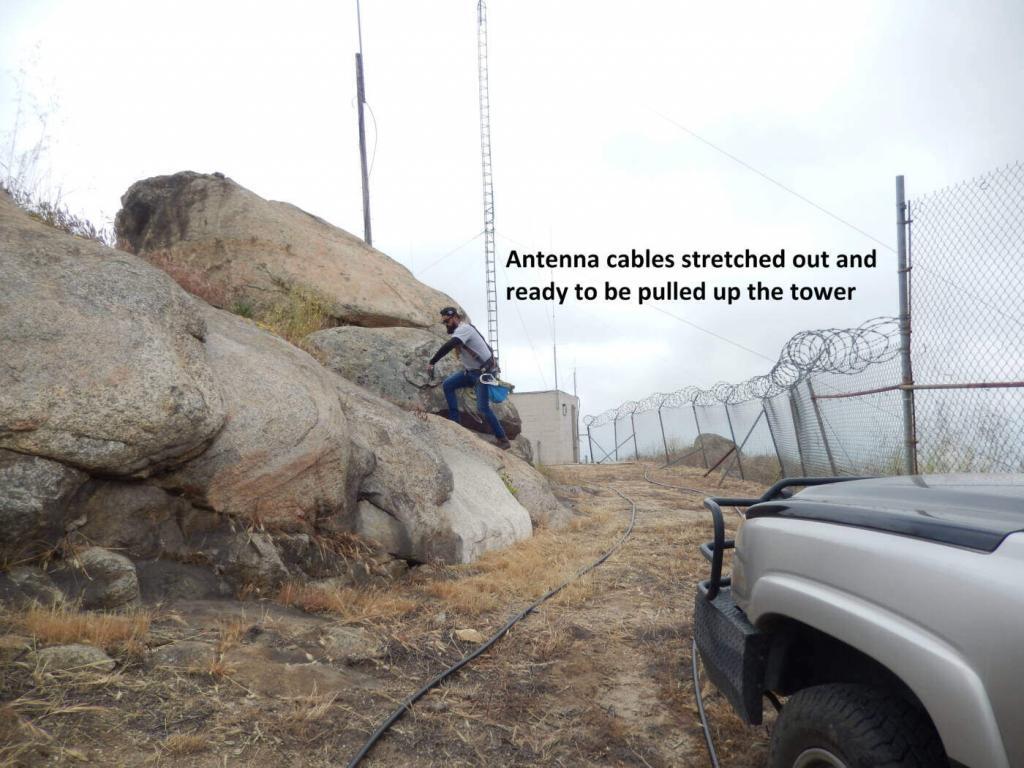
The antennas installation was progressing as the guys were getting the antennas mounted on the tower and the feed lines connected to the antennas. The receive antenna was placed at the very top of the tower while the transmit antenna was placed a bit lower. The transmit antenna was side mounted to the tower, so we had to pick a side of the tower to get the best signal since the tower will block the transmit signal in certain directions. Once the antennas were properly secured with the cables attached, it was time to secure the two cables down the tower as they unrigged the tower and lowered all the tools and supplies minus what they needed to finish securing the cable down the tower. Since the tower is about 100 feet tall, this process takes awhile to complete.
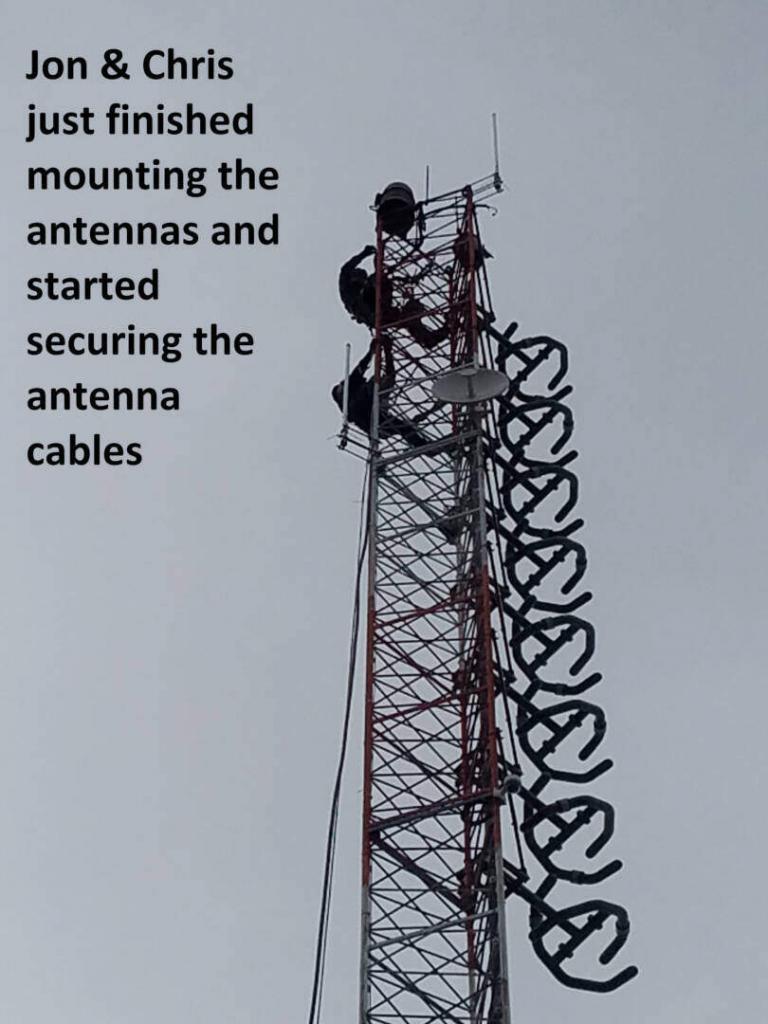
Once the cables were secure down the tower, the guys took a break for a few minutes to recover their strength, so after a brief rest, they started working on dressing the cables down the hill from the tower in the cable tray towards the building. Once the cables were near the side of the building, we ran into a somewhat unique problem. There seemed to be a beehive adjacent to the cable entry port on the side of the building. This made routing the cables through the cable entry difficult as we were constantly dodging the bees who were not happy with our intrusion into their space, but there was no other way to accomplish our task. The first problem is that the cable entry was a single large hole for the many cables that were entering the building. The hole was large enough for our cables to enter the building, but the hole was sealed with expanding foam to keep insects from entering the building. 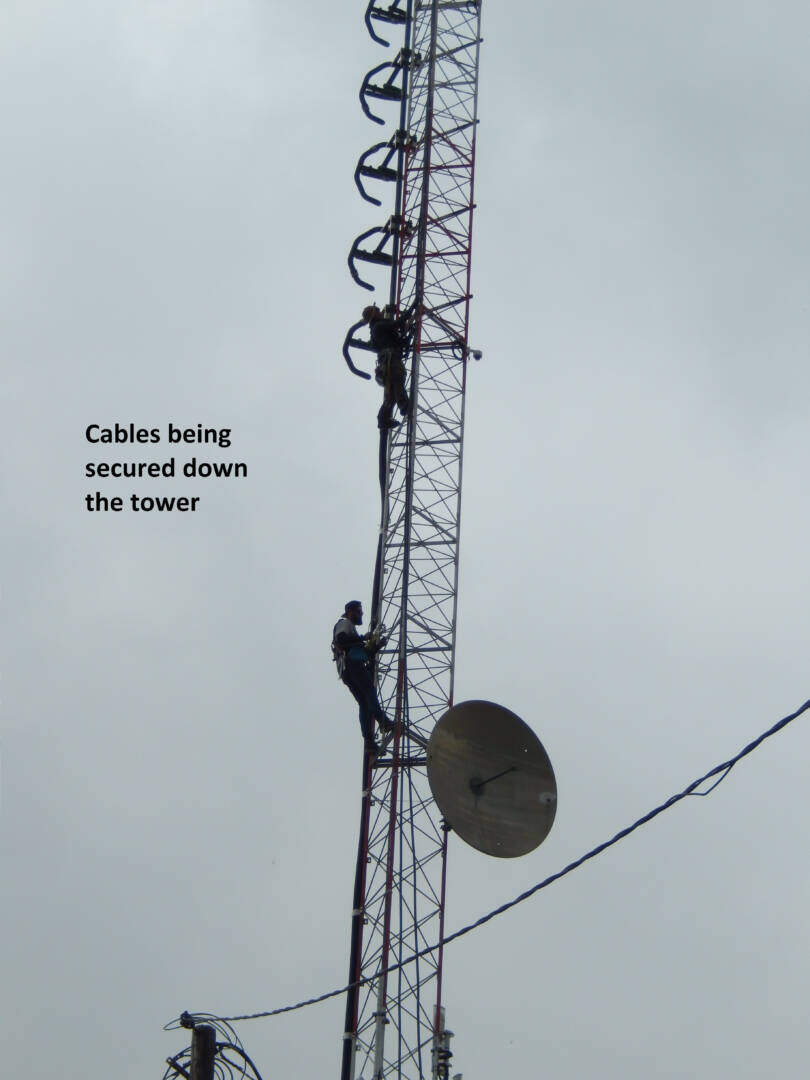 We now had to drill two holes through the foam, one for each of our two antenna cables. The cables we were installing were 7/8” hardline which has an outer diameter of approximately 1 1/8” which meant that we needed to drill a rather large hole in the foam without damaging any of the other cables that were entering the building. Drilling the holes became a challenge because of the presence of the bees and the fact that the existing cables did not go straight through the hole. Most of the cables appeared to go through the concrete block (which made up the building construction) at an odd angle which made it difficult to find a path through the foam for both of the two holes that we needed to drill. Fortunately, we managed to succeed in creating the cable entry holes which were drilled at 1 ¼” diameter to give us a little bit of wiggle room which feeding the cables through the hole in the wall.
We now had the cables inside the building but some of the bees had taken the opportunity to enter the building in the process of drilling the holes and feeding the cables into the building which meant that we had to work while be buzzed by the bees while attempting to chase them out of the building through the door. We routed the cables over to our equipment and properly secured them. Now it was time to cut the cables, perform the cable preparation for the connectors and install the hardline connectors on the cables. I performed this task which is made considerably easier with the use of the manufacturers cable preparation tool which strips the cable to the exact dimensions required to install the connector properly. With little fanfare, I completed the connector installation.
Now it was time to test the antenna installation. Nick went to my vehicle to retrieve my Anritsu antenna tester which I had to take out of the carrying case and set up for the testing. Unfortunately, the battery in the unit had recently failed so I have to get the external battery charger / power supply to plug the instrument into AC power which was not as convenient as when the unit operates on battery. However, I managed to get fully set up to test the antennas and proceeded to run the tests which indicated that both of the antennas had a good match. Unfortunately, the receive antenna performed batter at the transmitter frequencies and he transmit antenna performed better at the receive frequencies which added some irony and disdain to the test results, but the results were not skewed enough to warrant climbing the tower again to correct the minor issue.
Now it was time to attach the antennas to the system that had previously been made fully functional. We need two jumper cables of the appropriate type and length. By searching through our cable selection, both of the jumpers were located and installed. Finally after months of delays getting this site online, we finally had a fully functional site. Our radios performed well around the area no longer being limited to within 100 feet of the equipment. So now it was time to collect all of our tools and leftover supplies and pack them up into our vehicles. Each of the many tool boxes, tool bags and tool collections were restored to the previous condition and after about 20 minutes, we were fully packed up and ready to leave. Now it was time to take pictures of the installation, record the serial numbers and lock up the facility.
The job had gone very smoothly and it was now about 12:30 in the afternoon. Normally when we install a site on the Diga-Talk network, it is an all day job. Once in awhile the job goes smoothly and we are able to finish early and this was one of those times. So now we left the site and started our trek down the mountain reversing course from how we managed to head up the mountain working our way down the hill to the exit of Box Springs Mountain Park. Once we were back on the paved roads, we headed south back down the Moreno Valley towards the freeway. Since it was about 1PM at this point, I invited the entire crew to lunch at the local Mexican Restaurant to celebrate the new site on the network, the smooth operation during the installation and getting done so early in the day. We has a sumptuous lunch and no one left hungry so now it was time to head back to the real world and move on to our next project which was to perform another similar installation at Reché Peak.
Another job well done. . . . . . . .